Saturday, September 17, 2011

Nutella Cheesecake Layer Bars


You know friends who you can trust with anything? Not just secrets, but ANYTHING? Well, I am blessed to have a few of these “sisters-of-the-heart” and I love them dearly. We share secrets, memories, laughter, and good food. 

My precious friend, Amy Hickman, is one of my best buds from WAY back. So thankful for her, and so glad we also share a love of the same kind of treats … makes our friendship even sweeter. 

Here is one of the recipes she told me about, and I guarantee it is GOOD.  I mean it has Nutella in it people – what could be better than that?

Nutella Cheesecake Layer Bars

Ingredients:
8 Chocolate Graham Crackers
½ Stick Unsalted Butter, melted
16 oz. Cream Cheese, at room temperature
2 eggs, at room temperature
½ C. Granulated Sugar
¼ + 1 Tbsp. Heavy Cream
1 tsp. Vanilla Extract
¼ C. Nutella

Directions:
Preheat the oven to 325 degrees F.

Butter an 8 x 8 baking pan and line with parchment paper, making sure that the parchment is well pressed in the corners.  Set aside. 

In a food processor, pulse chocolate graham crackers until they become crumbs (like bread crumbs).  Add in melted butter and pulse until moistened.  Press graham cracker mixture evenly into the bottom of the prepared baking dish.  Bake crust in the center of the oven until set, about 12 minutes.  Set aside and cool. 

Clean out the food processor.  Add cream cheese, eggs, sugar, ¼ C. heavy cream, and vanilla extract.  Pulse until smooth.  Put 2/3 of the cream cheese mixture in a bowl and set aside.  Add Nutella and 1 Tbsp. of heavy cream to remaining 1/3 of the cream cheese mixture in the processor.  Pulse until smooth. 

To assemble, spread the vanilla cheesecake mixture over the cooled graham cracker base, being careful not to disturb the crust.  Pour Nutella cheesecake layer on top of vanilla layer and spread evenly.  Bake on the center rack of the oven for about 35 minutes, or until the center jiggles slightly.  Remove from the oven and cool completely on a cooling rack.  Refrigerate for at least 3 hours.
When ready to serve, lift bars out of the pan by lifting up the parchment paper (it should release easily).  Slice into 16 squares and serve. 
Yields 16 Squares
Shared by Amy Hickman. She found it at http://themoonlightbaker.com/2011/03/04/nutella-cheesecake-layer-bars/
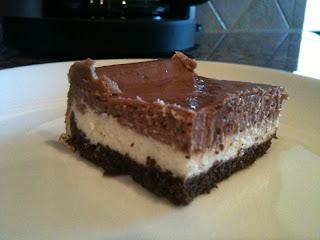
The finished product ... nothing but yumminess!
These are melt-in-your-mouth, add pounds to your thighs, worth every calorie fantastic!

Thursday, July 21, 2011

Coffee Punch = Knock-Out

I love me a frapuccino. There, I've said it! There's something about coffee and chocolate, swimming together in perfect harmony in a sea of icy refreshing bliss, that relaxes me and satisfies my sweet tooth craving on a blistering summer day.

One of my sweet friends requested my recipe for Coffee Punch for her in-law's Golden Anniversary celebration (praying it goes well, Brandy Edwards!) and I realized I must share it with you too. I received this recipe from my sister-in-law Dawn many years ago, and it has become one of my most-requested recipes. It is basically like a frapuccino to share with a group ... and, what could be better than an iced mocha with friends?

Do you like coffee? Well, then you are gonna love this, and I'm your new favorite person. Do you loathe coffee? I'm fairly certain you'll change your mind when you taste this creamy delight of a drink.

Serve this at your next ladies' night, baby shower, or shindig, and I promise you'll receive glowing hostess reviews!


Coffee Punch

Ingredients:
1-1/2 quarts water
½ cup chocolate drink mix (I use hot chocolate mix)
½ cup sugar
¼ cup instant coffee granules
½ gallon vanilla ice cream
½ gallon chocolate ice cream
Garnish: whipped cream or cool whip

Directions:
Bring water to a boil; remove from heat. Add drink mix, sugar and coffee granules; stir until
dissolved. Pour into a container; cover and refrigerate for at least 4 hours. Remove from
refrigerator at least 30 minutes before serving; pour into a punch bowl. Spoon in ice cream;
stir until partially melted. Garnish with whipped cream. Serves about 20-25.
Even non-coffee drinkers like this! I use decaf instant coffee.

Wednesday, July 6, 2011

Fruit Trifle Salad

I LOVE trifles ... they look so pretty in a trifle bowl :) After all, half the fun of cooking is in the presentation. And, who can resist a perfectly layered trifle, beautifully displayed in a trifle bowl? Knowing the trifle that awaits is delicious makes it even more irresistible.

This Fruit Trifle Salad is perfect for a church potluck or to serve at home on a hot summer day. I like using a lot of different fruit combinations to make this salad, which is really sweet enough to serve as a dessert :)


This recipe comes from one of my favorite cookbooks: Gooseberry Patch's A Pinch of This, A Dash of That Cookbook. I received this cookbook as a wedding gift and have used it repeatedly during my eleven years of marriage - even giving copies to new brides!

Ingredients:

6 oranges, peeled and sliced
3 bananas, sliced
3 c. blueberries
2 c. seedless grapes
3 c. strawberries, halved
4-oz. pkg. instant vanilla pudding
1-3/4 c. milk*
3/4 c. dairy sour cream
1 t. orange zest*


Directions:

In a large glass bowl, layer all of the fruit in order listed above. Fruit can be substituted for in-season items, except melon. For the topping, combine pudding mix and milk. Beat for one to 2 minutes. Beat in sour cream and orange peel. 

*when I don't have orange zest on hand and am not using oranges in the trifle, I reduce the milk by 1/4 cup and add 1/4 cup orange juice instead of the zest.

The original recipe can be found online at http://www2.gooseberrypatch.com/gooseberry/recipe.nsf/55e548eeef8c89b9852568d4004c5ffe/4E5ADF580BF64FE7852573E700581922

Thursday, June 30, 2011

Cool Dinner for a Hot Day: Primavera Salad

"Primavera" may mean "spring", but I always crave this salad on a hot summer day. To make it a main dish, add cooked & cubed chicken breast to the salad, or serve it as a side dish to grilled chicken. Either way, you'll have a refreshing meal that will make you feel like you're at your beach house, feeling the ocean breeze (when you're really sweating in the TX sun and staring at the blow-up pool in your backyard)!


Salad Ingredients:
1 7oz pkg refrigerated or frozen cheese-filled tortellini
1 medium sweet red or green bell pepper, cut to bite size
1 cup broccoli flowerets
1 medium carrot, thinly sliced - or make it easy and buy the bag of grated carrots! :)
fresh spinach leaves - I use about 2 cups or one small bag

Dressing:
1/3 cup mayonnaise
1/3 cup purchased pesto
1/4 cup milk
1/4 tsp pepper


Directions:
Cook tortellini; drain, Rinse with cold water; drain well. In a large mixing bowl combine tortellini, broccoli, pepper and carrots. Set aside.

Stir together dressing ingredients in a small mixing bowl. Pour over tortellini mixture; toss until combined. Cover and chill 4 to 24 hours. Mix in fresh spinach leaves right before serving.

Serves 6. Can be doubled and you should double it if you are taking it to a party or serving it to a crowd because it will disappear!

I got the recipe from my sister-in-law, Dawn, years ago. The original recipe was from Better Homes and Gardens Summertime Cookbook. Find Better Homes and Gardens online at http://www.bhg.com/.

Sunday, June 26, 2011

Sparkling Butter Toffee Cookies

I was trying to decide what to make for Life Group tonight, so I looked in the pantry at available ingredients. Since I had an unopened bag of Heath Bar Bits, I did a search for a Toffee Cookie recipe, and came across this one at recipegirl.com. (Thank you, Recipe Girl! I can already tell I'll visit your site again soon!)

These cookies turned out DELISH, so watch out Life Group ... one bite of these babies and you'll be praising the Lord for giving you taste buds. Enjoy!


Sparkling Butter Toffee Cookies

Ingredients:
1 cup granulated sugar
3/4 cup butter, softened
1 large egg
1 tsp vanilla extract
2 cups all-purpose flour
1 1/2 tsp baking powder
1/4tsp baking soda
1/2 cup toffee bits (or more)
additional sugar for rolling (sparkling white sugar works best)

Directions
1. Heat oven to 350°F. Line cookie sheets with parchment paper or silpat mats (or leave them ungreased).
2. Combine sugar, butter, egg and vanilla in a large bowl. Beat at medium speed, scraping bowl often until creamy.
3. In a small bowl, whisk together flour, baking powder and baking soda. Add to wet mixture and beat until well mixed. Stir in toffee bits by hand.
4. Shape dough into 1-inch balls. Roll in sugar. Place 2-inches apart onto prepared cookie sheets. Flatten each with bottom of a glass to 1½-inch circles (if glass sticks, dip in sugar).
5. Bake 9 to 11 minutes or until edges are just lightly browned. Do not overbake. Sprinkle with additional sugar while warm. Cool completely.

Yield: About 3 dozen

Saturday, June 18, 2011

My Daddy's Father's Day Gift

What a joy to know that I will be able to spend Father's Day with my precious Daddy tomorrow. I can think of no better way to spoil him rotten than by making him a dessert he's sure to enjoy. He LOVES Coconut Cream Pie, so I found this recipe for Coconut Banana Cream Pie at She Cooks, and am going to prepare it for our Father's Day lunch tomorrow. Hopefully he will like this twist on one of his favorite treats.
Whether you are celebrating in person with your dad, celebrating long-distance, or remembering his loving legacy, I pray tomorrow is a special day. Perhaps you don't know your dad, or didn't (don't) have a good relationship with him. If that's the case, I pray you know your Heavenly Father loves you and wants to know the love available to you through Christ Jesus ... He would love to hear from you tomorrow!
"For this reason I fall on my knees before the Father, from whom every family in heaven and on earth receives its true name. I ask God from the wealth of his glory to give you power through his Spirit to be strong in your inner selves, and I pray that Christ will make his home in your hearts through faith. I pray that you may have your roots and foundation in love, so that you, together with all God's people, may have the power to understand how broad and long, how high and deep, is Christ's love. Yes, may you come to know his love although it can never be fully known and so be completely filled with the very nature of God." Ephesians 3:14-19 (Good News Translation)


Coconut Banana Cream Pie
 

Ingredients:
  • 1 deep dish unbaked pie shell (or refrigerated crust or home made)
  • 1/2 cup semi-sweet chocolate chips
  • large package vanilla pudding mix (not instant) and the milk asked for on the box
  • 2 cups toasted coconut
  • 2 bananas, sliced (not overripe!)
  • 2 cups whipped cream (or Cool Whip)
Bake pie shell as directed. As soon as it comes out of the oven, sprinkle the bottom with the chocolate chips. Let sit for about five minutes for chips to soften then gently spread with the back of a spoon to coat the bottom of pie shell. Set aside to cool completely.
Prepare the pudding as directed on the box for pie filling. After pudding has set for five minutes, stir in 1 1/2 cups of the toasted coconut. Set aside to cool for 30 minutes.
Spoon 1/3 of the pudding into the bottom of pie shell. Top with a layer of sliced bananas. Repeat pudding and banana layer. Top the second layer of bananas with the remaining pudding. Cover with plastic wrap and refrigerate until cool.
Remove plastic wrap and top with whipped cream or Cool Whip. Use the back of a spoon to create peaks. Sprinkle with remaining toasted coconut. Refrigerate until ready to serve.

RECIPE NOTES:
  • If you are making this the day before serving, use Cool Whip or don’t top with whipped cream until shortly before serving.
  • The chocolate layer makes this pie difficult to cut. Use a very sharp knife and some muscle :) It really is worth the extra effort. In addition to the fact that chocolate makes everything taste better (and it tastes great with bananas and coconut), the chocolate keeps the crust from becoming soggy.
  • To toast coconut, spread a layer of coconut on a cookie sheet and bake in a preheated 350 degree oven for about 10 minutes or until golden.

Saturday, June 11, 2011

Holy Guacamole ... it's Avocado Salsa!

Something about summertime makes me crave chips, salsa and guacamole even more than normal (and that is saying a lot). That's why when my friend Shannon made Avocado Salsa for our Cinco de Mayo Bunco night (muchas gracias, amiga!), I went "loca" for this tasty treat! Ever since then, I've been craving it and finally got the recipe from her, so here it is! Enjoy!
Avocado Salsa
4 plum tomatoes, chopped
2 tbsp. finely chopped red onion
2 garlic cloves, minced
1 (4 oz) package crumbled feta cheese
1 tbsp chopped fresh parsley
3 tbsp red wine vinegar
2 tbsp olive oil
1/2 teas. dried oregano
1/2 teas. salt
2 avocados, chopped
Serve with tortilla chips.  Make this salsa shortly before serving for best results.  Avoid refrigerating it-texture of the tomatoes will soften.

My favorite tortilla chips are Mission Tortilla Chip Strips ... they sell them at Target, or I buy them in a giant bag at Costco for large groups!

Friday, June 10, 2011

No more cereal!

It is the first Friday of summer break and although I've offered my girls breakfast options each morning, they've chosen cereal all but one day. Today we said "no more!' It IS summer after all, so we can take our time and there's no where we have to be (I love the feeling of not rushing around).

On today's breakfast menu ....
.... homemade pancakes!

I tried a new-to-me recipe from Martha Stewart, and I've gotta say I really liked how they turned out (and the kiddos agreed). 

Here's the recipe for

Ingredients

  • 1 cup all-purpose flour, (spooned and leveled)
  • 2 tablespoons sugar
  • 2 teaspoons baking powder
  • 1/2 teaspoon salt
  • 1 cup milk
  • 2 tablespoons unsalted butter, melted, or vegetable oil
  • 1 large egg
  • 1 tablespoon vegetable oil
  • Assorted toppings, such as butter, maple syrup, confectioners' sugar, honey, jams, preserves, sweetened whipped cream, or chocolate syrup

Directions

  1. Preheat oven to 200 degrees; have a baking sheet or heatproof platter ready to keep cooked pancakes warm in the oven. In a small bowl, whisk together flour, sugar, baking powder, and salt; set aside.
  2. In a medium bowl, whisk together milk, butter (or oil), and egg. Add dry ingredients to milk mixture; whisk until just moistened (do not overmix; a few small lumps are fine).
  3. Heat a large skillet (nonstick or cast-iron) or griddle over medium. Fold a sheet of paper towel in half, and moisten with oil; carefully rub skillet with oiled paper towel.
  4. For each pancake, spoon 2 to 3 tablespoons of batter onto skillet, using the back of the spoon to spread batter into a round (you should be able to fit 2 to 3 in a large skillet).
  5. Cook until surface of pancakes have some bubbles and a few have burst, 1 to 2 minutes. Flip carefully with a thin spatula, and cook until browned on the underside, 1 to 2 minutes more. Transfer to a baking sheet or platter; cover loosely with aluminum foil, and keep warm in oven. Continue with more oil and remaining batter. (You'll have 12 to 15 pancakes.) Serve warm, with desired toppings.
I used a 2 Tablespoon measuring spoon to dip and pour the batter into the skillet, and this gave me 15 pancakes. We topped them with Best Life Buttery Spread and Log Cabin Original Syrup. I put the left overs on a cookie sheet and freeze them in a single layer. Once frozen, you can wrap stacks of two in wax paper and keep in a ziploc bag in the freezer. Remove a stack and place in the microwave or oven to reheat and serve for a fast warm breakfast another day.

Thursday, June 9, 2011

Feeling Hungry?

This is my first post for my blog ... I'm so excited! As the blog title indicates, I hope this blog will provide nourishment for your mind, body and soul. I plan on sharing some of my favorite recipes, as well as reviewing books.

Serendipitously, the first book I want to share with you is ...


..."The Hunger Games" by Suzanne Collins. I admit I'm behind the trend, because I've been hearing about this book for well over a year. That said, I am so glad I finally got around to reading it.

While you might not want to eat while you're reading, as some of the content might be a little unappetizing to you, I think you will LOVE this book. The characters are vividly described, and you find yourself cheering the main characters (Katniss and Peeta) on as they embark on an unusual quest for survival.  I don't want to give too much away, but the themes of survival and family, paired with Suzanne Collins' easy-to-read style, made this such an enjoyable book for me.

I purchased my copy at Barnes & Noble for my new nook (a sweet Mother's Day gift from my hubby) and I cannot wait to get my hand on the next two books in the series.

Now for some good eats .... the first recipe I want to share with you is "Italian Beef Sandwiches" (shared by my friend, Emily Young).

Ingredients:

41/2 pounds beef tip sirloin roast
1 can beef broth
1 can beer
1 cup water
1/4 cup cider vinegar
1 envelope onion soup and dip mix (I use the Market Pantry brand from Target because it doesn't have MSG)
1 envelope italian salad dressing mix
1 garlic clove, minced
1 teaspoon dried oregano
1 teaspoon basil

King's Hawaiian Sandwich Rolls - 2 Packages (for 8 rolls total)

Preparation: Place roast in a slow cooker. Combine broth, beer, water, vinegar, soup mix, dressing mix, garlic, oregano, and basil - pour over roast. Cover and cook on low for 7-8 hours or until meat is tender. Remove roast and shred (mine was so tender that I was able to leave it in the crock pot and pull it apart with my meat fork); return meat to juice in slow cooker. Use slotted spoon to spoon shredded meat onto rolls. Serve dipping juices for dipping.

Make it a meal: Serve sandwiches with a side salad and/or some steamed corn

This shredded beef is melt-in-your mouth good! For leftovers, I used the meat for soft beef tacos ... delish!

Looking forward to many future shared meals and books with you! (I realize there are none of "you" yet, but hopefully you will join me on my journey at some point!)